All posts by Macmint

How to charge iPhone 7 and listen to music at the same time

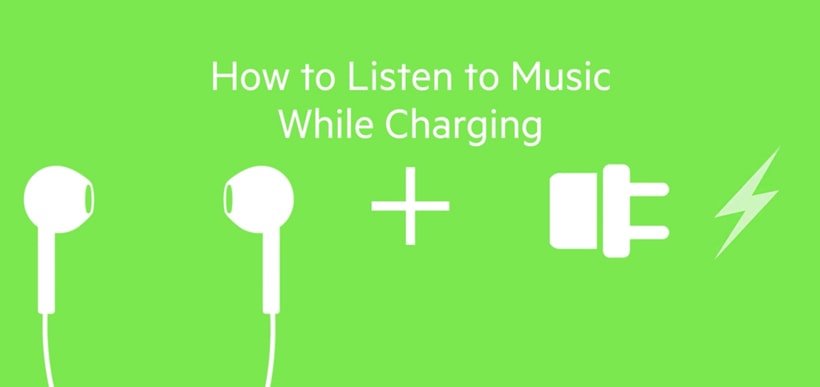
Recently many in the Apple community have been asking… “How can I charge iPhone 7 and listen to music at the same time?”

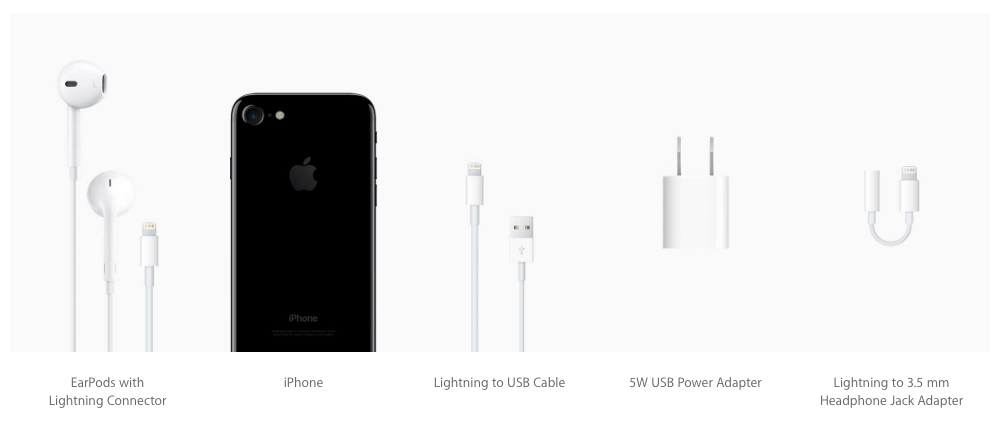
With the release of the iPhone 7, Apple has officially eliminated the analog 3.5mm headphone jack from the iPhone. The lightning connector is the only port remaining on the iPhone 7.

iphone 7 charge lightning

In the box you’ll find EarPods with Lightning Connector for listening to music and Lightning to USB Cable + USB Power Adapter for charging. Unfortunately both use the Lightening Connector on the iPhone 7 preventing you from charging and listening to music at the same time.

charge iPhone 7 and listen
iPhone 7 – What’s in the box?

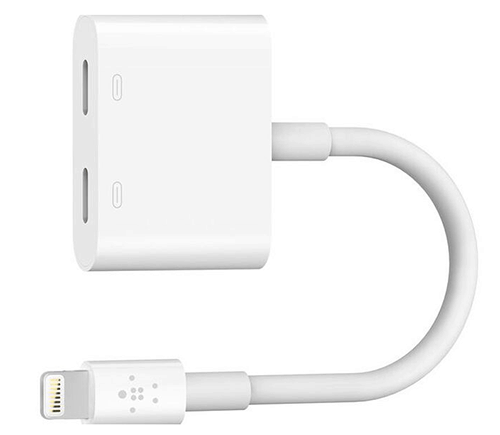
Luckily Belkin saw this problem coming and will soon be introducing the Lightning Audio + Charge RockStar™ (F8J198dsWHT) adapter for the iPhone 7 and iPhone 7 Plus. Priced around $40 it’s reasonable for an accessory but an additional cost to an already expensive iPhone.


RockStar™ Features:

  • Dual functionality to charge the device and listen to Lightning Audio at the same time
  • iPhone & iPad supported pass-through charging up to 12W
  • Supports up to 48 kHz + 24-bit audio output
  • Compatible with Lightning Audio headphones and the Apple Lightning to 3.5 mm Headphone Jack Adapter
  • Supports remote control & microphone from Lightning Audio headphones
  • Works with Apple iPhone 7 Smart Battery Case
  • Made for iPhone and iPad
belkin f8j198dswht
The Lightning Audio + Charge RockStar™ from Belkin

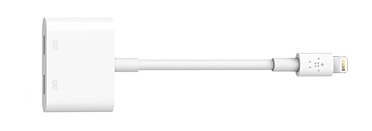
With the Belkin Lightning Audio + Charge RockStar™ adapter you’ll be able to use your EarPods with Lightning Connector and charging cable at the same time. Problem solved. Also since the iPhone now comes with a Lightning to 3.5 mm Headphone Jack Adapter you can use your old headphones as well.

Belkin iPhone 7 Adapter
Close-up of the Belkin Adapter, detailing two Lightning connections

Additional ways to charge iPhone 7 and listen to music simultaneously:

  • Buy wireless headphones to free up the Lightning Connector for charing. Apple’s new wireless AirPods were created just for this purpose. Though you’ll have to buy them separately. If you are not a fan of those there are many other styles available like the popular Beats Wireless Headphones.

Other Helpful tips:

  • Get a wireless charger for your iPhone. Currently even wireless charging needs a receiver that will still use your iPhone’s Lightning Connector so this isn’t technically a solution. However, having a wireless charger is easier to use than cables and helps you maintain a fully charged phone by just placing it on your desk or night stand charger. Hopefully in future releases this will be included in the iPhone.
  • Fully charge your iPhone before listening to music. This may not sound like a solution however newer iPhones can have 40 – 60 hours of audio playback time. Which means with a little planning you can leave your house and listen to music for a long time before charging.

How to quickly merge PDF files on Mac using Preview

Preview makes it easy to merge PDF files on Mac. Professionals may use advanced programs such as Adobe Acrobat Pro DC to combine PDFs, but Preview, which comes free with macOS, is ideal for most Mac users.

Preview has been around for a long time. In fact you may have used it when previewing images on your mac. Few however, are aware that Preview is a quick way to edit PDF files, including merging and arranging pages.

Combining PDFs in Preview is simple but lets go through the process slowly for those who have never merged PDFs.

How to Merge PDF files on Mac:

1. First open one of the PDFs you want to combine in Preview. You can do this by first opening Preview and going to File > Open. Or by right clicking the PDF and selecting Open With > Preview.

How to merge pdf files on a Mac

2. Next you’ll want to click on the View Menu icon in the upper left and select Thumbnails. Alternatively you can do this by selecting View > Thumbnails in the Preview menu bar.

Combine PDF Files on Mac

3. After selecting thumbnails you should see the page thumbnails in the Sidebar on the left.

How to combine PDF file on macOS

4. For this example we have the second PDF we want to merge on our desktop. You can simply drag the PDF from your desktop and hover it over the thumbnail of the first PDF until you see the Plus Symbol, then release.

Combine PDF mac

5. If you did it correctly you should see the second PDF is now added to your first PDF. Notice in the PDF title it now says Page 1 of 2.

How to merge PDF files

6. Finally, Save your newly created combined PDF.

Combine pdfs mac

7. Alternatively if you want to combine additional pages or only select pages from one document to another, we suggest opening both PDFs in Preview side-by-side. You can then drag and drop any number of pages and rearrange as you see fit.

pdf merge mac

Again there are many programs that can help you merge pdf files and even some websites offering to combine PDF for free. It’s clear however Preview for macOS is a simple and quick solution to merge PDFs on Mac. In addition to being able to merge PDFs, Preview also lets you rearrange and rotate pages. Apple also has a great support page on how to combine, reposition and rotate PDFs.

Let us know in the comments if this tutorial helped you merge pdf files on your mac.

What is the best iPod for kids?

One of the most popular electronic devices among children is the Apple iPod. Which leaves parents asking the popular question – What is the best iPod for kids?

Lets face it… kids today are better at operating electronic devices than some adults. Children are always adapting quickly to modern technology and new devices. So its natural for a parent to second guess themselves when buying electronics for children.


Currently you have three options when purchasing a kids iPod – the iPod touch, iPod nano or iPod shuffle. Lets review each and find the best iPod for kids.

iPod touch

ipods for kids

  • Most expensive
  • Largest Screen (4″)
  • Only iPod with Camera
  • Wireless/Bluetooth Capable
  • iOS Software

If you were to take the Apple iPhone and remove the phone capabilities you would in fact have an iPod touch. Though because it has wireless capability you can send iMessages and make calls via FaceTime as long as you have a wireless connection. The iPod touch is the flagship iPod, the top of the line, the best. If money is no issue this is the iPod for you.

It comes with the latest iOS software built-in just like the iPad or iPhone. So if your child is already familiar with those product they will have no issues. Additionally iOS allows you to download apps to your iPod, for children this means mostly games and educational apps. The iPod touch allows for parental controls so you can limit what your child has access to, a big plus for parents of younger children.

The iPod touch takes beautiful photos and video and is the only iPod to do so. The iPod touch price range is between $199-$399 depending on the amount of storage 16GB-128GB. Given that, the iPod touch is the best iPod for kids who are crazy about music, video, photos, games and apps but are not yet old enough to be given an iPhone.

iPod nano

best ipod for kids

  • Mid-Range Price
  • Smaller Screen (2.5″)
  • No Camera
  • Bluetooth Capable
  • Generic Built-in Software

The iPod nano closely resembles the iPod Classic (now discontinued) in that its main objective is to play music. Theres nothing too fancy about this iPod however it does have some unique features.

The bluetooth connection allows you to connect to other devices say your car radio or home entertainment system. So if your child is begging you to play their music in your car, the iPod nano has no problem allowing you both to sing along. Speaking of radio it comes with FM radio built in. It also comes with Nike+ support so you can get your child interested in fitness early and teach them to track their fitness goals.

Your child will be able to store images and watch videos but the iPod nano does not have a camera to take videos or photos. The main objective of the iPod nano is to allow kids to store and play music and even podcasts. If your child has no desire to play games and download apps but wants to be a DJ, then the iPod nano is for you. Reasonably priced at around $149 the iPod nano is the best iPod for kids who love music.

iPod shuffle

kids ipod

  • Lowest Price
  • Smallest iPod
  • No Screen
  • No Camera
  • No Wireless/Bluetooth
  • No Built-in Software

The main feature of the iPod shuffle is its size, about 1″ square. If your children are active and play sports the iPod shuffle includes a clip which will allow them to keep playing to their favorite songs. This is about as simple as a modern device can get.

The iPod shuffle plays music in two ways either by “shuffling” or playing yours in order, thats it. If you or your kids are good with iTunes you can sync playlists so that songs go in the order you prefer. Additionally, you can turn the volume up and down or move to the next/previous track that is about it.  It’s only standout feature is the VoiceOver button which lets you hear the names of the songs. At $49 the iPod shuffle is the best iPod for kids and parents on a budget.

Bottom Line

Simply put we recommend buying the iPod touch. The iPod touch has the most features and benefits and generally is the best iPod for kids. Additionally the iPod touch has the most accessories available. If you are on a budget and looking for a children’s iPod the nano and shuffle are great low cost options.

Thinking about an iPad or Tablet?  Check out our article about the best iPad or Tablet for kids here.

How to rotate a video on iPhone or iPad

You’ll be surprised to learn that iOS on both the iPhone and iPad don’t give you an option to rotate video. Photos yes, videos however are currently limited to clipping the length of the video only. Which leaves many people asking the popular questions: How to rotate a video on iPhone? or How to flip a Video?

Simple answer is, you’ll need to download and install an app from the Apple App Store to give you better functionality.

We’ve all shot video the wrong way at one point or another. There are even memes out there scolding and making fun of people for shooting vertical video. Monitors and tv’s are generally horizontal, which is the preferred video shooting orientation.

vertical-video-meme

One of our favorite apps to rotate video and more is Video Rotate and Flip by Wander bit. There are many apps out there to help you rotate video on the iPhone or iPad, but Video Rotate and Flip is the easiest to understand and has the most functionality. You can even flip your video in case you wanted to correct backwards text.

how-to-rotate-iphone-video

The app is one of the only rotating apps that can work as an extension, which allows you to edit your video files in the native iOS photos app. Here are some quick instructions after installing the application on how to rotate a video on the iPhone or iPad:

  1. Open the Photos App and select the video you want to rotate or flip
  2. Tap on the Edit Button in the upper right corner (The icon looks like 3 dots in a circle)
  3. Tap on More and click the Video Rotate & Flip extension to activate (Done the first time only)
  4. Use the controls to rotate or flip your video
  5. Click Done to save any changes

You can also use the native application to edit video if you choose though most seem to find editing in the Photos App is more convenient. Of course if this app can’t help you rotate iPhone video, you can always use various desktop applications like iMovie for Mac or Windows Movie Maker for PC.

Download – Video Rotate And Flip


Best 4k monitor for MacBook Pro

Finally 4k technology is affordable and with that you can enjoy the full high quality output of your MacBook Pro on large external desktop monitors. However, with all the options out there it can be overwhelming. So we put a list together of some of the best 4k Monitors you can buy for your MacBook Pro.

Until Apple comes out with a series of Apple 4k display monitors that rivals their Thunderbolt Display, you’ll have to use brands normally reserved for PC applications. This has become common place now though as more and more Apple enthusiasts are being introduced to these alternative brands by the introduction, for example, of Ultra HD televisions.

If you are wondering what Apple products support 4k, currently they are:

  • MacBook Pro (Retina, Late 2013) and later
  • Mac Pro (Late 2013)
  • iMac (27-inch, Late 2013) and later
  • Mac mini (Late 2014)
  • MacBook Air (Early 2015)
  • MacBook (Retina, 12-inch, Early 2015) and later

Lets get to it and take a look at some of the top 4k Apple display alternatives for your MacBook, MacBook Air and MacBook Pro!

Dell Ultra HD 4k Monitor P2715Q 27-Inch Screen LED-Lit Monitor

dell 4k monitor

Specs:

  • With 99% sRGB color coverage and a factory color calibration
  • Maximize your viewing options by adjusting the monitor to your desired height, or easily tilt or swivel to your preferred angle
  • Pivot from landscape to portrait view to easily see full pages at a glance
  • Feel free to mount the panel head to the Dell Single Monitor Arm or the wall for even more flexible viewing options

The Dell P2715Q Ultra HD 4k Monitor is most likely the first choice in 4k monitor options. Many people have had Dell monitors in the past and their positive experiences drive them to this brand time and time again. In fact most opt to purchase two of these monitors and daisy chain them. With an Ulltra HD 3840 x 2160 resolution and over 8 million pixels this monitor is great for digital artwork, movies and business applications. This monitor is a little more expensive than most at ($519 USD), but the added port options and swivel support are worth it. Theres even a 5k monitor but at ($1,700 USD), we don’t recommend the upgrade at this time.

LG Electronics 4K UHD Monitor 27UD68-P 27″ Screen LED-lit Monitor

best lg 4k monitors

Specs:

  • 4K UHD Resolution (3840 x 2160) IPS Display
  • sRGB over 99%
  • On-Screen Control with Screen Split
  • FreeSync
  • Pivot stand and functionality: Yes

If you are looking for a 4k Monitor to impress go with this LG 27UD68-P. Advertised as a gaming monitor due to it’s impressive refresh rate and clarity this monitor can do anything you need. Stunning Ultra HD resolution and advanced gaming features will give you hours of entertainment. Your MacBook Pro graphics will look great on this 4k monitor. One downside is that even though it comes with an HDMI cable its not the best quality cable and you may find yourself buying another one, but who can complain most brand don’t include the cable. Finally a high quality monitor at a decent price ($545 USD).

ASUS PB287Q 4k UHD 28-Inch LED Monitor

asus 4k monitors

Specs:

  • See every detail in 28-inch true 4K display with 3840 x 2160 UHD resolution, 157 pixels per inch, and real 10-bit color
  • ASUS Eye care technology with Flicker free for less Eye fatigue; Ergonomically-designed stand with Tilt,Swivel,Pivot,Height adjustment plus wall-mount capability for comfortable viewing position
  • Get the fastest 4K experience possible with 1ms GTG response time and 60Hz refresh rate
  • Connect to everything you own with HDMI, HDMI/MHL, and DisplayPort
  • Featuring ASUS-exclusive SplendidPlus, VividPixel, GamePlus, QuickFit technologies. ASUS Rapid Replacement: 3 Years Warranty, 2 way free shipping

The ASUS PB287Q 4k monitor is one a great choice for those who know the quality ASUS puts into their products. Designers looking for color quality will be impressed with the 1.07 Billion colors this monitor can produce, not to mention its 100M to 1 contrast ratio. Works great via HDMI and your MacBook Pro. Also available with a single arm mount, which we highly recommend for greater flexibility in positioning. Priced well at around ($450 USD) the additional mount will put you back another $100.

Bottom Line

There are many 4k Monitor options out there for your MacBook we recommend staying with the major brands: LG, Samsung, ASUS and Dell are some of the best. Currently if you are looking for a good balance of quality and performance you are going to be looking at the $400-$600 price range. The 4k monitors above all fall in that category and compliment your Apple MacBook well.

Before we forget you’ll most likely also need an HDMI cable, there are some specific 4k cables out there but needing an expensive Apple 4k cable is not necessary as we recommend the Amazon Basics High Speed HDMI. Hope this helped you pick the best 4k monitor for your needs. Let us know in the comment section which one you have or are planning on purchasing.