In previous versions of Apple iOS users were permitted to sign out of Game Center inside the stand alone app. Currently you are unable to log out of Game Center while in the app itself. This has caused some confusion with with iOS users leading them to ask “How do I sign out of Game Center?”
Signing out of Game Center and logging back in can resolve issues you may be having with your iPhone or iPad. Signing out of Game Center is easy but difficult to find if you are not used to iOS settings.
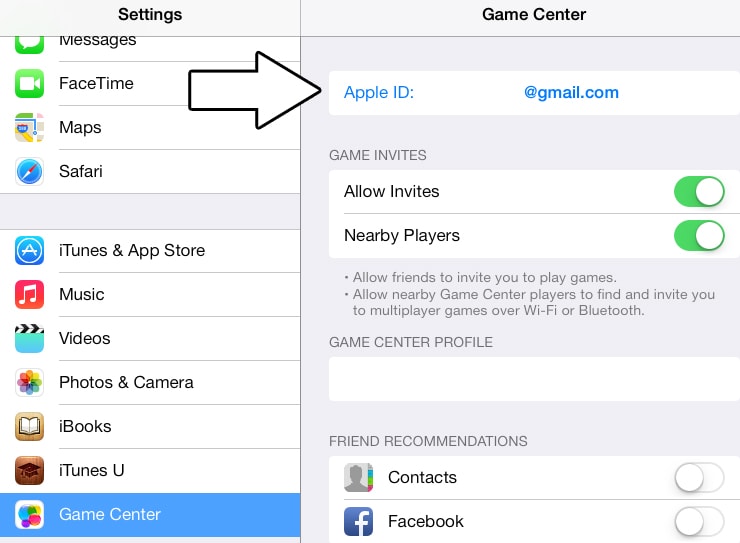
Steps to Log Out of Game Center:
Go to Settings > Game Center
Click on your Apple Id
Click Sign Out
Click on Settings, Game Center then Apple IDFinally, Click Sign Out of Game Center
FaceTime is an awesome video app that helps you connect with friends and family, but with any modern application sometimes things can go wrong. One of the most common support questions is why wont my FaceTime work? If you are having issues with FaceTime not working, chances are that there is a quick fix but it could also be the sign of a more serious problem. This article will help you navigate some of the most common reasons FaceTime won’t connect.
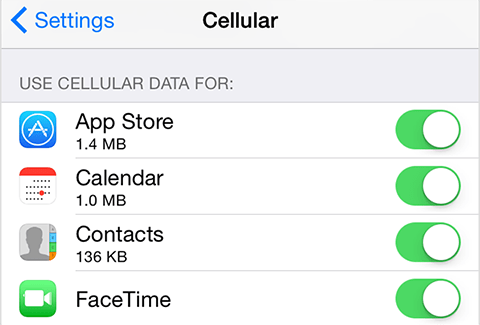
1. Check to see if your computer or mobile device is connected to Wi-Fi or a cellular network as this may fix FaceTime not connecting
For Wi-Fi: Go to Settings > Wi-Fi and choose your Wi-Fi network. Double check that the internet loads by opening a browser.
For Cellular: Go to Settings > Cellular and make sure your cellular data connection is active. Also under “Use Cellular Data For” make sure FaceTime slider is in the “green” or on position.
FaceTime Cellular Setting
2. Make sure FaceTime is turned on
You’d be surprised how many people accidentally turn this off. Go to Settings > FaceTime and check that FaceTime is turned on.
3. Make sure your cellular network supports FaceTime over mobile
Apple has setup this page to check if your cell network allows for FaceTime over cellular. It could be FaceTime Video and Audio calling isn’t available in your country or region.
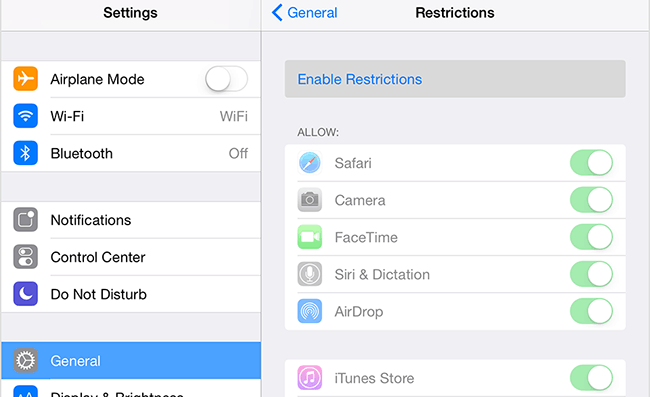
4. If you have restrictions on, turn them off
Go to Settings > General > Restrictions and turn restrictions off. If you need restrictions on at the very least make sure FaceTime and Camera aren’t off under the same settings.
Restriction Settings FaceTime
5. Make sure FaceTime is activated
Under Settings > FaceTime if you see “Waiting for Activation” turn FaceTime off then back on. If it still doesn’t activate try the other quick fixes in this article or check Apple’s support article on FaceTime activation errors. On a Mac, first open the FaceTime application then go to FaceTime > Preferences and turn FaceTime off and back on.
6. Check you are using the correct phone number and email address
Go to Settings > FaceTime and make sure your proper phone number is showing. Is the email correct too?
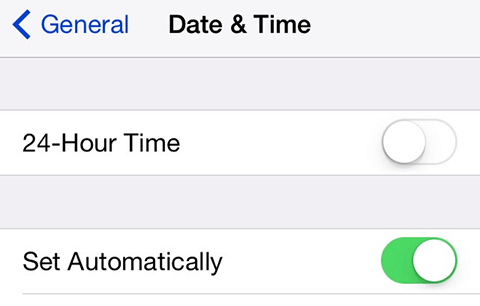
7. Change your Date and Time to be set automatically
Go to Settings > General > Date & Time then click the”Set Automatically” button to on. On a Mac go to System Preferences > Date & Time and check the box next to “Set date and time automatically.”
When using FaceTime Set Date & Time Automatically
8. Restart your iPad, iPhone or Mac
If all your FaceTime settings seem to be correct but you are still experiencing issues simply restart your device. If FaceTime failed, this may relieve the errors.
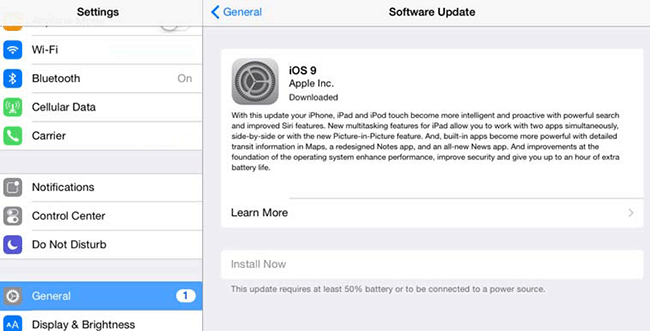
9. Update your operating system to the latest release
Go to Settings > General > Software Update. Check to make sure your software is up to date. There is a history of expired device certificates giving FaceTime issues, recent updates have fixed this problem.
FaceTime iPad Software Update
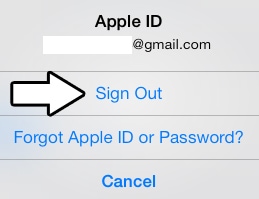
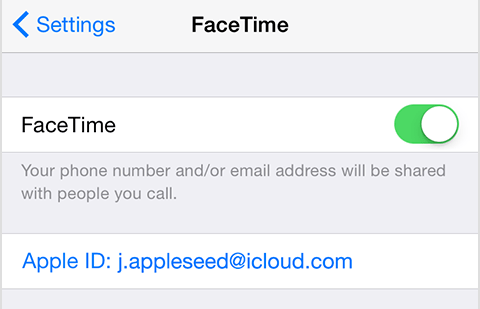
10. Check to see if you are using the same Apple ID on all devices
Some people end up signing up with Apple and creating different IDs. Go to Settings > FaceTime and check that your Apple ID is the same on all devices. To be sure you can sign out then sign in with the same Apple ID on all your devices.
Apple ID FaceTime
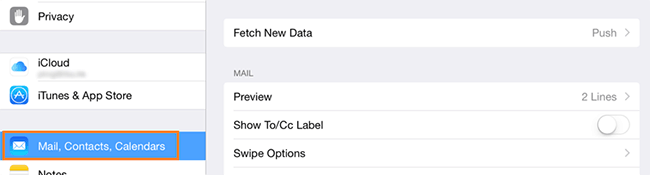
11. Make sure the Fetch New Data is set to “Push”
On your mobile device go to Settings > Mail, Contacts, Calendars > Fetch New Data and and select Push. Your Apple mobile device uses this function to alert FaceTime of an incoming video call.
FaceTime Push Data
12. Check your FaceTime blocked list
Go to Settings > FaceTime > Blocked and look at the list of names. If the person you are trying to connect to is in that list, tap on Edit and then click Remove to unblock them. Your friends and family could have been added to this list accidentally.
13. Check to see if the FaceTime application is shown on your device
If the FaceTime app is missing it could be your device was purchased in Pakistan, UAE or Saudi Arabia. FaceTime may not be available in those countries.
14. If you are still having trouble finding the FaceTime app or with FaceTime not working, restore your device
Make sure you first back up your device using iCloud or iTunes, then proceed with restoring your device. This should be one of your last options before contacting Apple Support.
Final Suggestions
We hope these tips helped fix your FaceTime not working. You can always visit Apple’s support knowledge base and forums for additional help. If you tried one of the suggestions above and it fixed your issue please let us know in the comment section below. If you tried something different to fix your FaceTime not connecting let everyone know as well.
Have you ever deleted a file only to remember you needed it for something important? It has happened to the best of us and we normally find ourselves digging through the desktop trash can. Now, thanks to iCloud.com, you can restore files, contacts and calendars with a few clicks. This is one feature you’ll love from iCloud.com, which is the desktop browser based platform for files that come from your iPad, iPhone and Mac devices.
Follow these steps to recover your deleted files from iCloud.com:
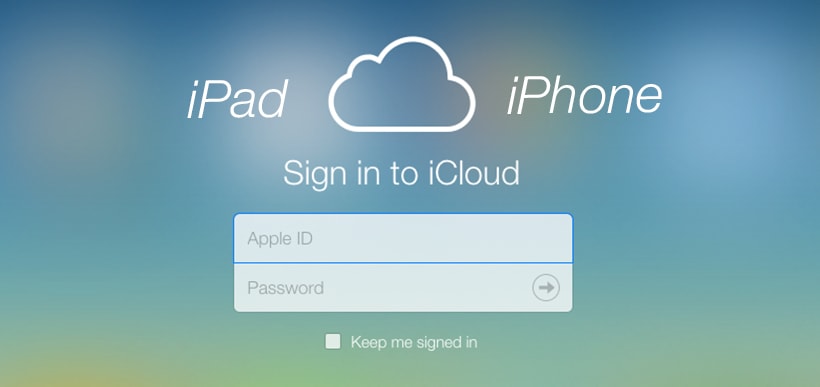
1. Visit iCloud.com, Login and click Settings. (iCloud Login)
iCloud.com Login Screen
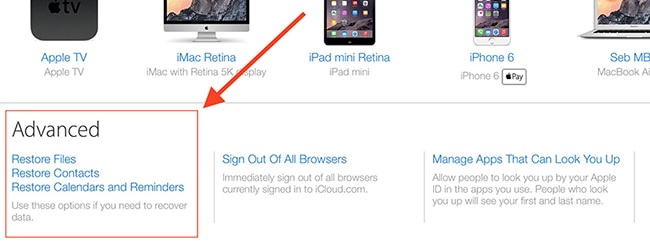
2. In the lower right hand corner of the Settings page, under Advanced, click Restore Files.
Advanced Section of iCloud Settings
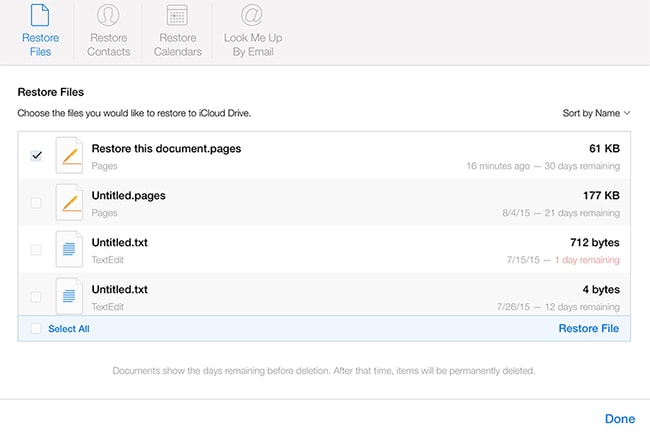
3. On the Restore Files page select the file which you wish to recover and click Restore Files.
Note: You’ll notice next to your deleted documents it will show the days remaining before deletion, after that date all documents will be permanently deleted. It might be a good idea to check this page from time to time to ensure you are not losing important files accidentally.
Restore Files Page on i Cloud.com
Additionally you’ll notice you can recover deleted Contacts. Simply follow the same procedure above and navigate to the Restore Contacts tab. When you click Restore Contacts you will restore deleted contacts you may have trashed accidentally. Once a week iCloud archives all your contacts.
Warning: Restoring an archive will replace all your current contacts, which means contacts you deleted will be recovered, but you will lose any you have added since the date shown.
iCloud Deleted Contacts
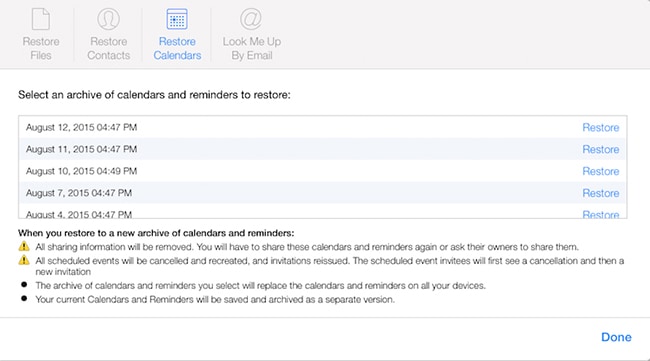
Calendars and reminders are also archived, however iCloud backs up this data on a daily basis instead of weekly like the contacts. This is probably due to the fact that calendars and reminders are accessed more frequently. Warning: When you restore a calendar archive all sharing information is removed. Additionally all scheduled events are cancelled and recreated.
iCloud.com Restore Calendars
We are happy to see Apple create this iCloud.com restore files function as I’m sure it will be a life saver for some of us. If you need additional help Apple has set up an iCloud support page and knowledge base.
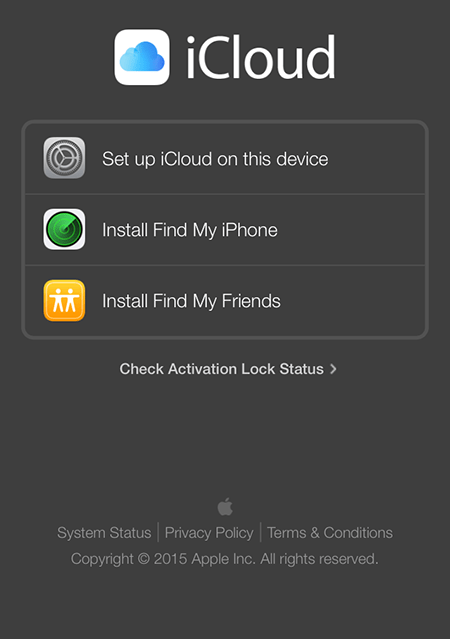
When you attempt to sign into iCloud.com from your iPhone or iPad you will be presented with three options: Setup iCloud on this device, Install Find My iPhone and Install Find My Friends. These options have many users asking, “Where is the iCloud login?” or “How do I sign into my iCloud Account?” You’ll notice there is no iCloud login button that lets you sign into iCloud. The reason being Apple does not let you sign into iCloud.com website from a mobile device.
If you think about it there really is no reason to sign in to iCloud from mobile or have an iCloud app because your iOS device already has access to all your iCloud content. If you get frustrated with iCloud, you could also try Cloud Drive which has both mobile and desktop apps.
iCloud login from mobile
But if you must, there are two ways you can access the icloud.com sign in. First by accessing your icloud.com account using a desktop computer (Mac or PC) and any web browser or secondly by using your iPad or iPhone with a web browser other than Safari.
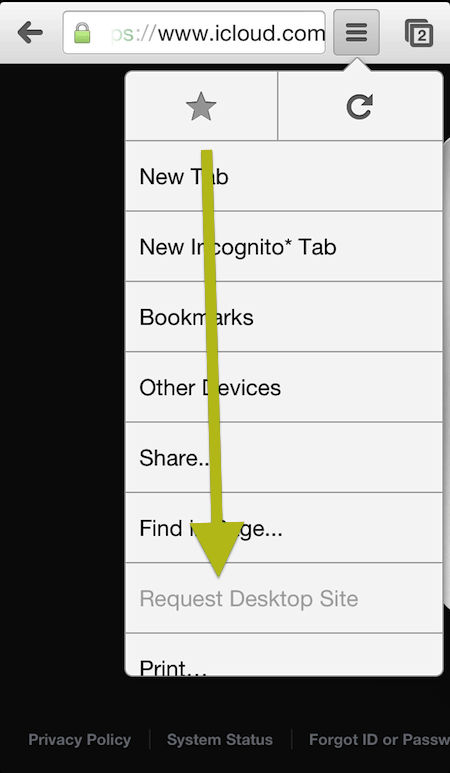
Chrome Browser by Google (iOS): iCloud Login
Download Chrome from the App Store, then using Chrome, visit https://www.icloud.com and select the “Request Desktop Site” under the menu options. This forces or “tricks” your mobile device into showing the desktop version of iCloud.com, now you can use your iCloud email login as usual or even create a new iCloud account.
icloud.com/sign in with Chrome
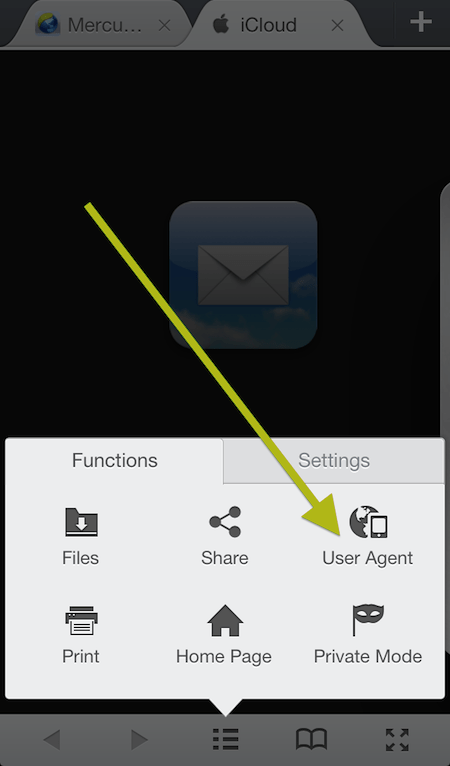
Mercury Browser (iOS): iCloud Login
Another free browser app you can download is Mercury. Download the app in the app store, load up Mercury Browser and launch https://www.icloud.com. Under the browser settings go to Functions then Identify Browser as and click Mac OSX Safari. Again this will trick iCloud.com Apple id login, into thinking you are accessing the site from a desktop. Now you can easily access the Apple iCloud login page while on the iPhone or iPad.
iCloud login using Mercury Browser
If you still need help you may want to check out some of the how-to guides and digital downloads available online. There is a large selection of iCloud help books online that are inexpensive and provide helpful information.
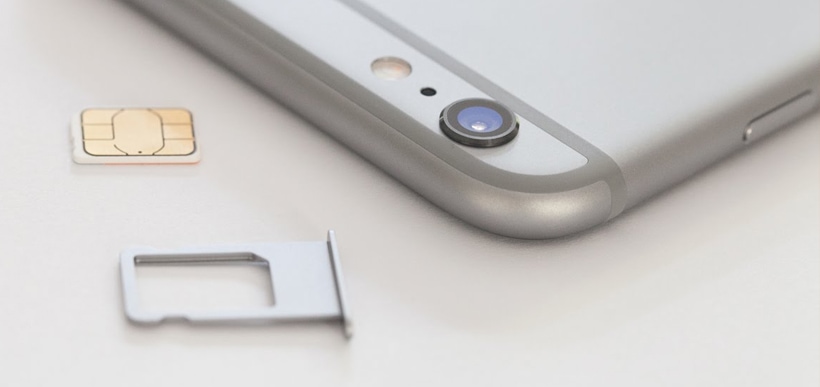
When you want your old mobile number assigned to a brand new sim, PDP Authentication Failure can happen. Usually, you will need to wait 24 to 48 hours before all the information is transferred from the old sim card to the new sim card. During this process, you may experience some difficulties such as the PDP authentication failures in iPhone. If this happens, you will get an error message while attempting to connect to the data network.
Possible reasons for PDP Authentication Failure in an iPhone
Wrong phone settings
Lost connection or network outage
High volume traffic on the current network
This problem is very common when you buy a new phone and you have to change your SIM. Usually, the error stems from the APN settings. You must make sure that the APN is set up properly. To check if the APN is set up correctly, you must try to synch your new phone to iTunes while using the new SIM. If the problem persists after doing this, then you may need help of an expert.
Another reason why PDP Authentication Failure occurs is because of data outage. If there is no data to use, then the authentication will fail. This error is common in iDevices such as iPads and iPhones.
To counter this problem, you must verify if you have data available on your account to begin browsing. You can trying reaching out to the SIM Company or visiting their website. Checking both your data and APN will ensure that you prevent PDP Authentication Failure for your device.
Helpful Tips to Stop PDP Authentication Error
Try re-inserting the SIM
Try to reset the network settings on your device. Make sure all settings are in default. For iPads, the default APN is prepay APN
Call your SIM Company for more assistance if these steps did not work