Category Archives: How-To

How to Force Quit on Mac: Troubleshooting the Frozen Beach Ball

We’ve all been there before. It’s 2am and you’re trying to play that new album that your friend recommended in iTunes. Then it appears, the spinning beach ball of death. Learning how to force quit on mac can save you time and frustration.

Luckily for you, we got you covered. You want to know how to force quit on Mac, don’t you? Perhaps you’re an avid Windows user and you’re used to hitting the good old Control-Alt-Delete when things are all locked up on you. Well, now you’re a Mac user so you’re not accustomed to the new commands. Not to fret.

The good news is that there are several ways to make this happen. The bad news is that you might not get to practice it too much because Macs are generally highly responsible devices.

How to Force Quit on Mac: The Force Quit Option in the Dock

how to force quit on mac
Hit the Option/Alt key to change to Force Quit

You’re staring at the beach ball and you move the mouse up to the menu to try to close it but it’s all beach ball, all the time. It’s okay because we have the dock at the bottom of the screen that can help us out.

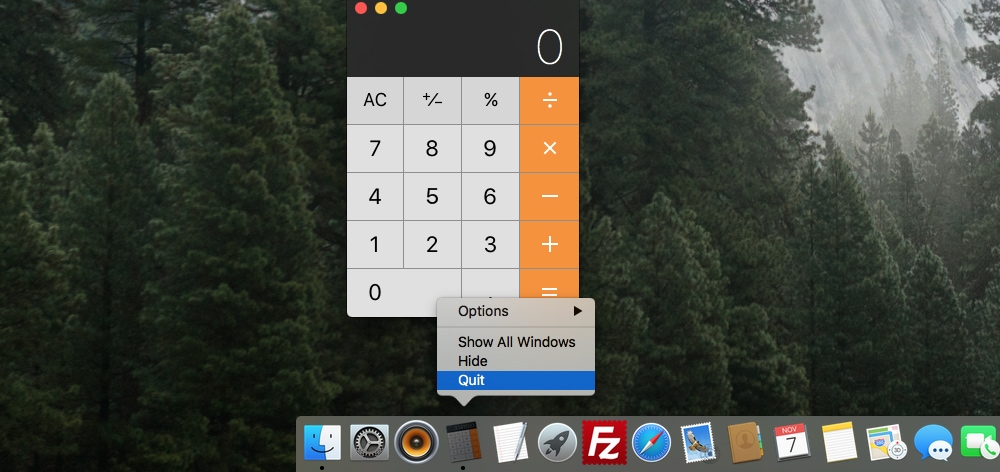
Go to the bottom of the screen, find the icon for the app, then right click (or control + click). You’ll bring up the “contextual menu” and then you hit the Quit option at the bottom. Hopefully that does it and the app will close. If not, try again, but when the contextual menu appears hold down the ALT key and the Quit option will change to Force Quit. Boom. Select Force Quit and the troublesome program should close immediately.

One more cool way to find the Force Quit option on a Mac is to change to another program that is working and then head up to the Apple icon at the top left of your screen. From there you can select the Force Quit option from the drop-down list. Voila! You have used the force quit Mac option and the program is gone.

How to Force Quit on Mac: Using the Keyboard to Force Quit

For you Windows users, this might be a lot more comforting of an option. Yes, you can use your keyboard to force quit on Mac.

When you find that you can’t escape from an app through the Force Quit option in the dock, you can simply hold down the Command-Option-Esc keys. Within the list that appears is every app that is running on your system. You can then force quit on the one that is causing you a problem. Mostly likely it will be the one that says “Not Responding” and you can simply highlight it and then click Force Quit at the bottom of the window. This handy Mac function is probably the most similar to your beloved Control-Alt-Delete PC function.

How to Force Quit on Mac: When Your Stuck in the Application

Mac Force Quit
Command-Shift-Option-Escape

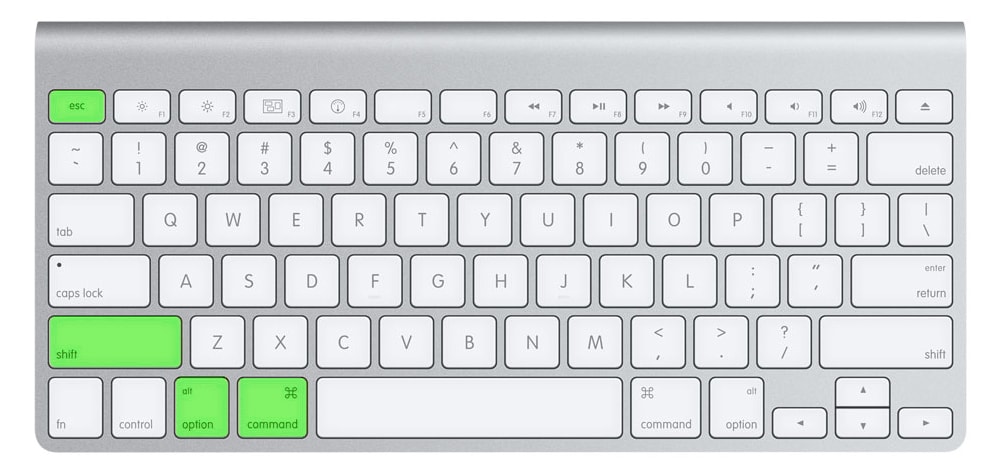
Uh oh. You’ve tried all of the above but you can’t get out of the app! Not to fear. There is a solution for you. Just hold down CommandShiftOptionEscape and OS X will close whichever app is currently active. This is a nuclear option when you just have to get out of the app and it’s not responding.

How to Force Quit on Mac: Use the Activity Monitor

Force Quit Mac
Select the unresponsive program and hit the X button

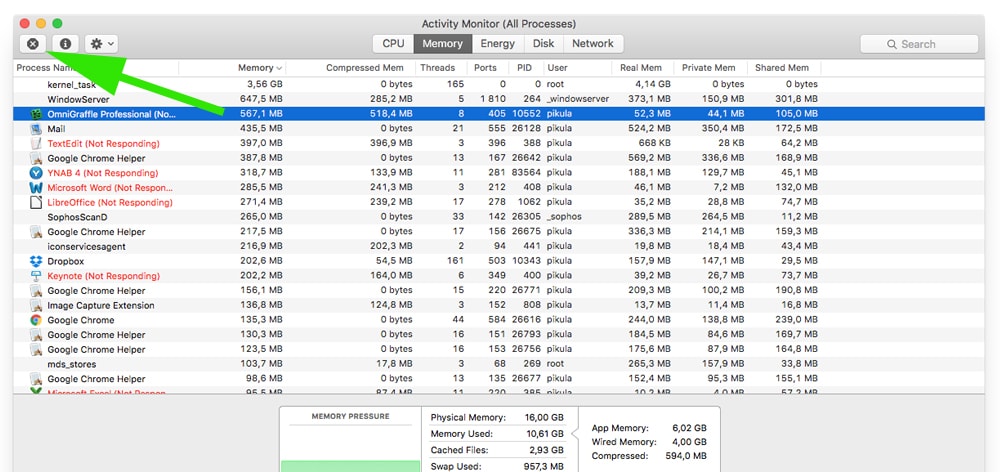
Another handy function on your Mac is the Activity Monitor. Go to the Finder and then navigate to Applications>Utilities/Activity Monitor and you’ll see all of the applications that are running. Double click the app and hit the Quit button to quickly force quit on your Mac.

How to Force Quit on Mac: Frozen Computer, What Next?

We hope this doesn’t ever happen to you but what do you do when your compute is completely frozen? Simple. Just hold down the Power button and your computer will restart. This is the most drastic option for restarting your computer. Keep in mind that files that were not saved may not be there when you restart. Use this option only when all else fails.

At this point, you should have plenty of different ways to Control-Alt-Delete on your Mac and also have all the tools at your disposal to make your Mac force quit whenever necessary. Although Macs are stable systems, sometimes you might have to use the good old Control-Alt-Delete (PC) or rather the Command-Option-Esc (Mac) to get things moving again.

How to charge iPhone 7 and listen to music at the same time

Recently many in the Apple community have been asking… “How can I charge iPhone 7 and listen to music at the same time?”

With the release of the iPhone 7, Apple has officially eliminated the analog 3.5mm headphone jack from the iPhone. The lightning connector is the only port remaining on the iPhone 7.

iphone 7 charge lightning

In the box you’ll find EarPods with Lightning Connector for listening to music and Lightning to USB Cable + USB Power Adapter for charging. Unfortunately both use the Lightening Connector on the iPhone 7 preventing you from charging and listening to music at the same time.

charge iPhone 7 and listen
iPhone 7 – What’s in the box?

Luckily Belkin saw this problem coming and will soon be introducing the Lightning Audio + Charge RockStar™ (F8J198dsWHT) adapter for the iPhone 7 and iPhone 7 Plus. Priced around $40 it’s reasonable for an accessory but an additional cost to an already expensive iPhone.


RockStar™ Features:

  • Dual functionality to charge the device and listen to Lightning Audio at the same time
  • iPhone & iPad supported pass-through charging up to 12W
  • Supports up to 48 kHz + 24-bit audio output
  • Compatible with Lightning Audio headphones and the Apple Lightning to 3.5 mm Headphone Jack Adapter
  • Supports remote control & microphone from Lightning Audio headphones
  • Works with Apple iPhone 7 Smart Battery Case
  • Made for iPhone and iPad
belkin f8j198dswht
The Lightning Audio + Charge RockStar™ from Belkin

With the Belkin Lightning Audio + Charge RockStar™ adapter you’ll be able to use your EarPods with Lightning Connector and charging cable at the same time. Problem solved. Also since the iPhone now comes with a Lightning to 3.5 mm Headphone Jack Adapter you can use your old headphones as well.

Belkin iPhone 7 Adapter
Close-up of the Belkin Adapter, detailing two Lightning connections

Additional ways to charge iPhone 7 and listen to music simultaneously:

  • Buy wireless headphones to free up the Lightning Connector for charing. Apple’s new wireless AirPods were created just for this purpose. Though you’ll have to buy them separately. If you are not a fan of those there are many other styles available like the popular Beats Wireless Headphones.

Other Helpful tips:

  • Get a wireless charger for your iPhone. Currently even wireless charging needs a receiver that will still use your iPhone’s Lightning Connector so this isn’t technically a solution. However, having a wireless charger is easier to use than cables and helps you maintain a fully charged phone by just placing it on your desk or night stand charger. Hopefully in future releases this will be included in the iPhone.
  • Fully charge your iPhone before listening to music. This may not sound like a solution however newer iPhones can have 40 – 60 hours of audio playback time. Which means with a little planning you can leave your house and listen to music for a long time before charging.

How to quickly merge PDF files on Mac using Preview

Preview makes it easy to merge PDF files on Mac. Professionals may use advanced programs such as Adobe Acrobat Pro DC to combine PDFs, but Preview, which comes free with macOS, is ideal for most Mac users.

Preview has been around for a long time. In fact you may have used it when previewing images on your mac. Few however, are aware that Preview is a quick way to edit PDF files, including merging and arranging pages.

Combining PDFs in Preview is simple but lets go through the process slowly for those who have never merged PDFs.

How to Merge PDF files on Mac:

1. First open one of the PDFs you want to combine in Preview. You can do this by first opening Preview and going to File > Open. Or by right clicking the PDF and selecting Open With > Preview.

How to merge pdf files on a Mac

2. Next you’ll want to click on the View Menu icon in the upper left and select Thumbnails. Alternatively you can do this by selecting View > Thumbnails in the Preview menu bar.

Combine PDF Files on Mac

3. After selecting thumbnails you should see the page thumbnails in the Sidebar on the left.

How to combine PDF file on macOS

4. For this example we have the second PDF we want to merge on our desktop. You can simply drag the PDF from your desktop and hover it over the thumbnail of the first PDF until you see the Plus Symbol, then release.

Combine PDF mac

5. If you did it correctly you should see the second PDF is now added to your first PDF. Notice in the PDF title it now says Page 1 of 2.

How to merge PDF files

6. Finally, Save your newly created combined PDF.

Combine pdfs mac

7. Alternatively if you want to combine additional pages or only select pages from one document to another, we suggest opening both PDFs in Preview side-by-side. You can then drag and drop any number of pages and rearrange as you see fit.

pdf merge mac

Again there are many programs that can help you merge pdf files and even some websites offering to combine PDF for free. It’s clear however Preview for macOS is a simple and quick solution to merge PDFs on Mac. In addition to being able to merge PDFs, Preview also lets you rearrange and rotate pages. Apple also has a great support page on how to combine, reposition and rotate PDFs.

Let us know in the comments if this tutorial helped you merge pdf files on your mac.

How to rotate a video on iPhone or iPad

You’ll be surprised to learn that iOS on both the iPhone and iPad don’t give you an option to rotate video. Photos yes, videos however are currently limited to clipping the length of the video only. Which leaves many people asking the popular questions: How to rotate a video on iPhone? or How to flip a Video?

Simple answer is, you’ll need to download and install an app from the Apple App Store to give you better functionality.

We’ve all shot video the wrong way at one point or another. There are even memes out there scolding and making fun of people for shooting vertical video. Monitors and tv’s are generally horizontal, which is the preferred video shooting orientation.

vertical-video-meme

One of our favorite apps to rotate video and more is Video Rotate and Flip by Wander bit. There are many apps out there to help you rotate video on the iPhone or iPad, but Video Rotate and Flip is the easiest to understand and has the most functionality. You can even flip your video in case you wanted to correct backwards text.

how-to-rotate-iphone-video

The app is one of the only rotating apps that can work as an extension, which allows you to edit your video files in the native iOS photos app. Here are some quick instructions after installing the application on how to rotate a video on the iPhone or iPad:

  1. Open the Photos App and select the video you want to rotate or flip
  2. Tap on the Edit Button in the upper right corner (The icon looks like 3 dots in a circle)
  3. Tap on More and click the Video Rotate & Flip extension to activate (Done the first time only)
  4. Use the controls to rotate or flip your video
  5. Click Done to save any changes

You can also use the native application to edit video if you choose though most seem to find editing in the Photos App is more convenient. Of course if this app can’t help you rotate iPhone video, you can always use various desktop applications like iMovie for Mac or Windows Movie Maker for PC.

Download – Video Rotate And Flip


How to reset Time Capsule and other AirPort Base Stations to factory default settings

How to reset time capsule or other AirPort Base stations.  If your Apple AirPort Express, AirPort Extreme or AirPort Time Capsule is failing to respond to your commands it may be time to do a factory reset. Additionally, this is an option if you’ve lost your password or your AirPort base station isn’t functioning as it has in the past. Lets learn how to reset Time Capsule and others with these quick tips.

reset-time-capsule
Reset button location for: AirPort Extreme and AirPort Time Capsule 802.11ac

It should be noted that a factory reset will not erase any of your files from the AirPort base station. However, as in other articles, we always recommend having a fail proof backup system or at least a quick temporary backup.

Apple likes to make things a little confusing when it comes to resetting. In fact, there are three types of resets: Soft, Hard and Factory Reset.

hard reset time capsule
Reset button location for: AirPort Extreme 802.11n (top) and AirPort Time Capsule (bottom)

For this how-to article we are going to assume you have a Time Capsule for simplification purposes. Don’t worry if you have an Express or Extreme you can follow the same procedures.

reset apple time capsule
Reset button location for: AirPort Express 802.11n (2nd Generation)

If you are interested how to reset Time Capsule and you still have control of your AirPort Utility (Applications > Utilities) then you can try a soft or hard reset first. You should start with a soft reset first and the main difference between a soft and hard reset of your Time Capsule is the amount of time you hold the reset button. If you can not access the AirPort Utility then do a full factory default reset of your Time Capsule.

Soft Reset

  1. Press and hold the Time Capsule reset button for 1 second, then release (LED will begin flashing).
  2. Open the AirPort Utility (Applications > Utilities).
  3. After you select the Time Capsule, Click Edit.
  4. The Time Capsule is now in Soft Reset Mode.
  5. Simply move through the settings tabs and make adjustments as you see fit.
  6. Click Update or Continue as needed.
  7. Quit AirPort Utility.

Hard Reset

    1. Press and hold the Time Capsule reset button for 5 seconds (LED starts to flash rapidly).
    2. The Time Capsule will restart. (Takes about 1-2 minutes)
    3. Open the AirPort Utility (Applications > Utilities).
    4. Select the Time Capsule from Other Wi-Fi Devices, then click Edit.
    5. Select the Other Options button, Click Restore Previous Settings and then Done.
    6. Quit AirPort Utility.


Factory Default Reset

  1. First unplug your Time Capsule’s power cord.
  2. Press and hold the Time Capsule reset button.
  3. While continuing to hold the reset button plug in the power cord to your Time Capsule.
  4. Continue holding until the LED starts to flash rapidly.
  5. Your Time Capsule has now completed the Factory Reset.

Always reset Time Capsule before trying other options. If the soft, hard and factory reset do not solve your problems with your Time Capsule it may be a sign of a more significant problem like hard drive failure. In that case we recommend contacting Apple support or visiting your local Apple store for help.