CalDigit releases new Thunderbolt Station 2 available now for pre-order

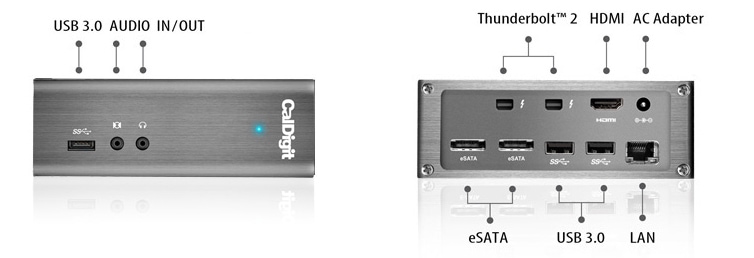
With their new release CalDigit is looking to take back market share by providing a significant upgrade to their Thunderbolt docking station hardware. The new Thunderbolt Station 2 (TS2) provides Thunderbolt 2 support and is their most anticipated product to date. The TS2 comes with a host of new features. First, the look is professional and matches most Apple products on the market today, a great pairing to your MacBook Pro. The redesigned case now comes standard with Thunderbolt 2 ports accessing speeds of 20 GB/sec, two eSATA ports and the HDMI supports 4K resolution.

thunderbolt-2-ports

The new CalDigit TS2 is a direct competitor to the Elgato Thunderbolt 2 Dock and Belkin’s Thunderbolt 2 Express Dock HD. Even thought the TS2 doesn’t come with a Thunderbolt cable it’s pre-order price of $170 makes it the most affordable model. Not to mention it has more ports and a solid die-cast aluminum construction. It will be interesting to see if the other manufacturers begin to reduce their prices.

caldigit-thunderbolt-station-2

Switch to a no contract plan for your iPhone and save up to $62 a month

Now that the iPhone 6 and 6 Plus are out many have to make a decision: Should I keep my current iPhone or upgrade? Quickly many have come to the conclusion that their old phone such as the iPhone 5 is in good shape and the added features of the iPhone 6 are not enough to make them want to go out and buy. However, if your two year plan with AT&T or Verzion is up, many companies are offering gift certificates for older iPhones if you upgrade. Very tempting, because you could upgrade at little or no cost, as long as you sign another two year contract agreement. But you have an alternative you may not have looked into yet, such as Cricket Wireless. Their no contract plans are easy to understand and you can bring your own phone:
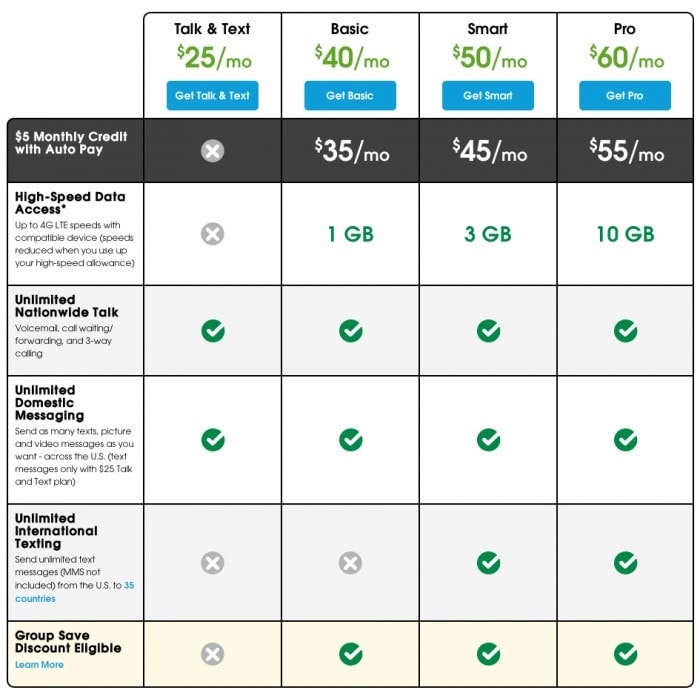
cricket-wireless-plans

Now that we’ve seen the low monthly plans for Cricket Wireless lets take a look at a hypothetical scenario comparing Cricket to AT&T. Comparing apples to apples, all plans offer unlimited text and talk with 3 GB of data (reduced speeds after 3 GB). In the example we use the iPhone 6 with 64 GB of memory vs. your paid-in-full iPhone 5.

[table id=2 /]

By far the best deal is to keep your iPhone 5 and switch to Cricket. But there is a small additional cost, Cricket charges $10 to send you a sim card in the mail, bringing the grand total to $1090 for the next two years. The most staggering difference though is even if you switched to Cricket and bought the iPhone 6 outright for $749 (ouch!) you would still save $750 over a 2 year period when compared to buying the same phone and staying with AT&T. That’s a savings of $31 a month! You can see why so many people are switching to no contract plans. Another benefit of switching to Cricket Wireless is that they are owned by AT&T and use the same nationwide network, so if you are used to solid LTE service expect no change.

Of course there are numerous phones, plans, companies and options to choose from and we can’t show you everything in a simple chart. It’s best to do your homework and find what’s best for you, your family or your business. Our comparison here is for the frugal individual, the person that’s tired of being drained by their monthly phone bill and is looking for solid savings. If you are comfortable with AT&T but need a no contract plan theirs starts at $65 a month.
Five iOS 8 theme setups that will make you want to jailbreak your iPhone

Currently one of the biggest reasons for users to jailbreak their iPhone are the abundance of customization options. Programs downloadable through Cydia don’t have to conform to Apple guidelines, therefore giving the end user a greater level of personalization than those found in the App Store. Once jailbroken a lot of those minor annoyances you deal with everyday in iOS can be fixed including how it looks. Themes are quite easy to implement and personalize. Take a look at the following setups, showcased below, for inspiration.

Woods:

Light Brown:

Minimal:

Refined:

Simplistic:

How to rename your Magic Mouse in OS X

This question gets asked a lot: How do I rename my bluetooth Magic Mouse (and other bluetooth devices) in Mac OS X? It’s actually quite simple, just not immediately apparent. When you first set up your bluetooth device it will typically use your name as the identifier, for example: John Doe’s Magic Mouse. Some people for privacy reasons need to change this, others want to change the name just for fun.

Renaming your Bluetooth Devices

  1. Go to System Preferences, then Mouse
  2. In the lower right, click Set Up Bluetooth Mouse
  3. A list of your connected devices appears, right click the name of the device you’d like to change
  4. Click Rename and enter a new name of your choice, then click Rename again to finalize

Note: There are two other ways to get to these settings:

– Click on the Bluetooth Icon in the Menu Bar, then Open Bluetooth Preferences
– Click on System Preferences, then Bluetooth

How to make an OS X Yosemite install drive

Backups are always important that’s why we recommend one when it comes to your operating system. Of course you can always use a Time Machine backup (if you have it enabled) but for speed and use with multiple setups it’s nice to have quick access to a bootable drive. Maybe you even want to build a Hackintosh (don’t worry, your secret is safe with us).

By far the easiest way to do this is to use a flash drive and a program called DiskMaker X. The program is free to download and easy to understand. In does all the hard work for you and creates a bootable OS X disk in a snap.

yosemite-install-disk

Creating an OS X Install Drive:

  1. Download and install DiskMaker X.
  2. Download the Yosemite Installer from the App Store. (Hint: If you’ve already installed Yosemite on your computer you can hold the Option Key while clicking on the purchases tab to re-download the installer from the App Store).
  3. Plug an 8GB flash drive or larger into your computer. (Warning: Do not use a drive with information on it as this process will completely erase the disk’s contents.
  4. Open the DiskMaker X program and choose Yosemite (10.10) from the list.
  5. From there DiskMaker X will do all the work for you.

That’s it, you’re done. Now to launch the installer using the drive, simply insert your flash drive and hold down the Option Key when rebooting your computer. You’ll find that the installer comes with Time Machine recovery and Disk Utility as well.