Category Archives: How-To

How to disable Magic Mouse scrolling

With its wireless and multi-touch capabilities, the Apple Magic Mouse is quite magical indeed. That is until you dive deep into multi-page PDFs, large spreadsheets and other documents that require extra fine mouse control. The Magic Mouse can be sensitive and easily cause you to lose your place with the slightest movement. This can only lead to anger, frustration and lost time. Lets disable Magic Mouse scrolling once and for all.

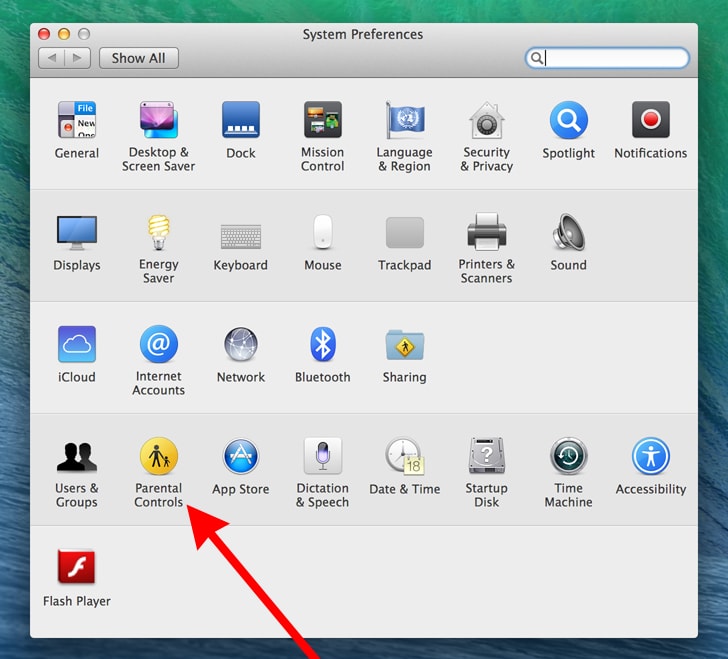
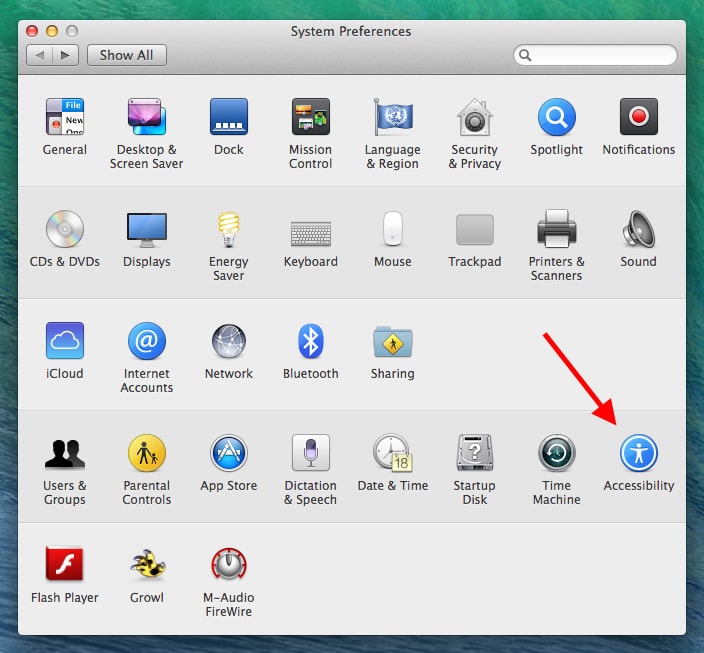
1. Go to your System Preferences and select Accessibility.

disable-magic-mouse-scrolling-1

2. Now under Accessibility, scroll down the left menu and select Mouse & Trackpad. Then in the lower right select Mouse Options.

disable-magic-mouse-scrolling-2


3. You have a few options now to fine tune your scrolling. To completely disable scrolling, uncheck the scrolling checkbox. You can also leave it checked and modify your scrolling by either adjusting the scroll speed from slow to fast or changing the drop down menu from with inertia to without inertia. To finalize your changes click done.

disable-magic-mouse-scrolling-3

Now you know how to disable Magic Mouse scrolling completely. However some people may want to disable only the horizontal scrolling and leave the vertical scrolling on. To do this you will have to use the Terminal. The Terminal application is located in your Applications/Utilities folder. Although not difficult to complete we would recommend for advanced users only.

To disable horizontal scrolling paste the following command in Terminal, and hit Return:

defaults write com.apple.driver.AppleBluetoothMultitouch.mouse MouseHorizontalScroll -bool NO

To re-enable horizontal scrolling paste the following command in Terminal, and hit Return:

defaults write com.apple.driver.AppleBluetoothMultitouch.mouse MouseHorizontalScroll -bool YES

For these Terminal commands to take effect you will have to do one of two things. On the bottom of the Magic Mouse turn the power button to off, then back on to reconnect via bluetooth. Your second option would be to restart the computer. After that your changes should take effect.

How to setup parental controls in OS X

Any parent should be concerned with how to put Parental Controls on their Mac device. Whether on a shared desktop computer or the child’s own laptop, setting up Parental Controls is always a pressing need. Luckily for you, Apple has made it quite easy to set up Parental Controls and apply them to specific accounts easily. To learn how, just follow the simple guide below:

1. Click on the Apple menu and select System Preferences
mac-parental-controls-1
Step 1 of Mac Parental Controls
2. Select Parental Controls
mac-parental-controls-2
Step 2 of Mac Parental Controls
3. Click on the lock to make changes
mac-parental-controls-3
Step 3 of Mac Parental Controls
4. Enter your administrator password
5. Select the account, to which you would like to add parental controls
mac-parental-controls-4
Steps 4 & 5 of Mac Parental Controls
6. Navigate between the tabs (Apps, Web, People, Time Limits & Other) located at the top to change parental control specifics
7. Apps Tab

You can change three settings in the Apps Tab. First, if your child is very young you may want to chose to use the simple finder, this will make the computer desktop easier to use but for most children this is not needed. Second you can limit applications, one of the core features to parental controls. Simply check the limit applications box and select which applications you want to prevent your child from using. Lastly you can prevent the dock from being modified (recommended).

mac-parental-controls-5
Steps 6 & 7 of Mac Parental Controls
8. Web Tab

This is the most visited tab by parents. You have three options but the most popular are to either limit adult sites only or to allow access to websites you specify. Additionally you can click the logs button and view a history of the websites visited by the user.

mac-parental-controls-6
Step 8 of Mac Parental Controls
9. People Tab

With the People Tab you are allowed to set limits for games, email and messaging through iChat.

mac-parental-controls-7
Step 9 of Mac Parental Controls
10. Time Limits Tab

This is an important tab that is underutilized by parents. The Time Limits Tab allows parents to select specific times a user is allowed to gain access to the computer. If you don’t want to be so selective, simply put limits on how many hours daily you would want your child to be on the computer. The tab has both weekday and weekend settings. It’s a great way to limit usage and push your children to be more active and social.

mac-parental-controls-8
Step 10 of Mac Parental Controls
11. Other  Tab

Anything that didn’t fit into the other tabs got thrown into the Other Tab. Here you can control access to the built-in camera, dictation, dictionary, printer administration (recommended), password changes (recommended) and finally cd/dvd burning.

mac-parental-controls-9
Step 11 of Mac Parental Controls

Setting up Parental Controls is easy and can be completed in a just a few minutes. Most parents spend most of their time adjusting limits in both the Web and People Tabs, adjusting website access and blocking the ability to chat with strangers. Apple has some additional parental control resources in their knowledge base.

Tip: When you’re finished don’t forget to click the lock to prevent further changes.

Tip: Clicking the logs button at the bottom of each tab will give you access to the user’s websites visited, websites blocked but attempted to access, applications used and chat messages.