Category Archives: How-To

How to make an OS X Yosemite install drive

Backups are always important that’s why we recommend one when it comes to your operating system. Of course you can always use a Time Machine backup (if you have it enabled) but for speed and use with multiple setups it’s nice to have quick access to a bootable drive. Maybe you even want to build a Hackintosh (don’t worry, your secret is safe with us).

By far the easiest way to do this is to use a flash drive and a program called DiskMaker X. The program is free to download and easy to understand. In does all the hard work for you and creates a bootable OS X disk in a snap.

yosemite-install-disk

Creating an OS X Install Drive:

  1. Download and install DiskMaker X.
  2. Download the Yosemite Installer from the App Store. (Hint: If you’ve already installed Yosemite on your computer you can hold the Option Key while clicking on the purchases tab to re-download the installer from the App Store).
  3. Plug an 8GB flash drive or larger into your computer. (Warning: Do not use a drive with information on it as this process will completely erase the disk’s contents.
  4. Open the DiskMaker X program and choose Yosemite (10.10) from the list.
  5. From there DiskMaker X will do all the work for you.

That’s it, you’re done. Now to launch the installer using the drive, simply insert your flash drive and hold down the Option Key when rebooting your computer. You’ll find that the installer comes with Time Machine recovery and Disk Utility as well.


How to remove the free U2 album from iTunes and iPhone

Apple recently automatically gave everyone with iTunes a free copy of U2’s new album “Songs of Innocence,” but many people are actually up in arms about this digital intrusion. Some simply are not fans or even follow that genre of music.

Apple will not let you delete the album but it is easy to hide the album in iTunes. In fact you may not even see the album at first in your library if you don’t have “Show All Music” setting enabled.

Heres how to hide the album from iTunes:
  1. Open iTunes
  2. Navigate to the iTunes Store
  3. Click on Purchased under Quick Links
  4. Locate U2’s “Songs of Innocence”
  5. Hover and Click the X in the upper-left-hand corner of the album

That album is now hidden in iTunes, but you’ll still see it on your iPhone because of the “Show All Music” setting we mentioned earlier.

Lets take a look at how to fix that on your iPhone:
  1. On your iPhone, navigate to Settings
  2. Select Music
  3. Turn off Show All Music

Done! Enjoy your U2 free iPhone and iTunes.

How to enable Apple’s two step verification

Last week’s hack of Hollywood photos was a wake-up call to the general public and the Apple Corporation about being lax with internet security. Apple’s devices can all enable two-factor authentication now, and these steps will show you how it’s done, so you can protect yourself all the more effectively.

two-step-apple-verification-1

First, long into the Apple ID system. You can either go to https://appleid.apple.com or just find the “Manage your Apple ID” listing in your device. If this is the first time you’ve heard of it, you should know that you can also do billing and update contact information from this listing as well.

Second, find “Password and Security” from the options menu, and answer the security questions that it provides. Then scroll to the “Two-Step Verification” listing and click the “Get Started” link.

two-step-apple-verification-2

Third, Apple will send you an SMS with a verification code to the phone number you’ve assigned on your Apple ID. If your phone number is out of date and needs to be changed, you’ll have to wait 72 hours before being able to change the number—this is another Apple security measure that prevents hackers and other people from immediately locking you out of your own device.

Fourth, after you have the SMS and entered the verification code, you can register an iPad, iPhone, or iPod on which you’ve already used your Apple ID, to enable “Find my iPhone”. Currently these are the only devices you’ll be able to receive future codes with, sent as a special push notification from Apple. Apple may add more devices to the security list in the future. 

Lastly, Apple will generate a unique recovery master key that can be used to unlock your account if you forget your password or don’t have access to any of your devices. Apple strongly recommends you write down the recovery key and store it in a secure place—like a bank deposit box or a gun safe.  

two-step-apple-verification-3
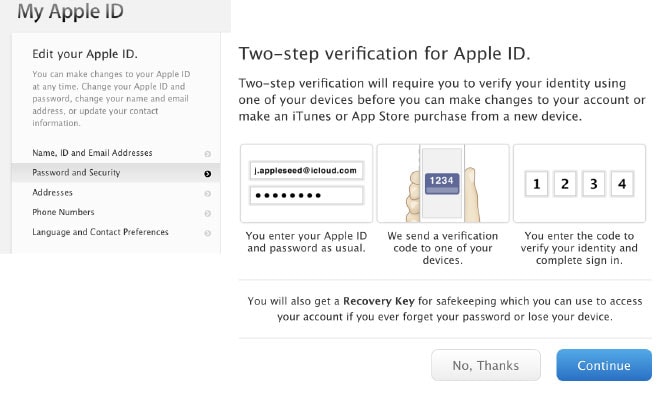
Now a general warning: If you manage to forget your password, throw away your recovery master key AND lose access to all of your “trusted” devices, you will not be able to login to the Apple ID system, period. No exceptions. Apple Corporation will officially not be able to help you, but a customer service representative can recommend replacement devices for you to buy.
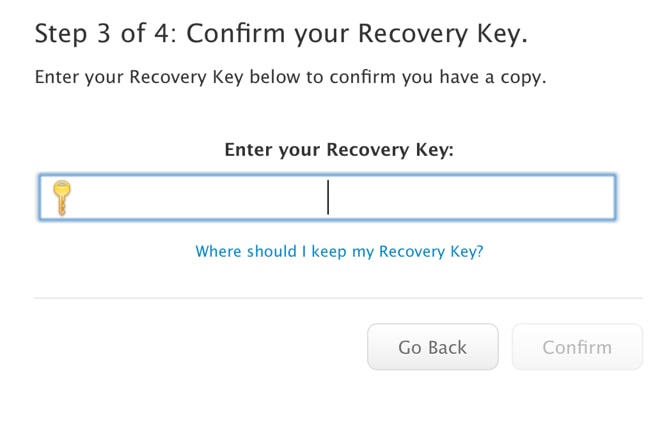
Anyway, when you’ve finished your verification process, you’ll be asked for a code when you try to go online. Apple will be installing more two-step verification for more tasks, like restoring backups on a new device, later this year.

How to delete duplicate songs in iTunes

Over time, we as fastidious music collectors, obtain album after album of songs from our favorite artists, just to discover that we already had that song in our iTunes library. If that sounds familiar, here’s how you can go about deleting duplicate songs in iTunes for Mac.

Note: In order for this process to work, you must be in “Song” view. It will not work in Album or Artist view.

  1. Open iTunes.
  2. In the file menu, Click View.
  3. Next, click Show Duplicate Items.
  4. iTunes will now do a ton of work for you, and will display just the songs that are named exactly the same.

Now here comes the tedious part. Instead of showing only one copy of each song, it shows both (or however many copies you have) copies. So you’ll have to go through each one and select the copy you want to delete from your library.

  1. Hold down the Command key, and select each title that you want to delete.
  2. Once you’ve selected everything you want to delete, simply drag it to the trash in the Dock.
  3. Empty the Trash by right clicking on the Trash icon and selecting Empty.

You’ll want to be careful. A few artist are fond of releasing songs that are named the same title as other songs, but have a different beat or mix. iTunes won’t be able to tell the difference. So you could delete a song even if it isn’t the same. So, to fix this problem, iTunes has a function that lets you find and delete only exact copies of particular songs. Here’s how to do that:

  1. Open iTunes
  2. In the file menu, Click View.
  3. Hold down the Option key. You’ll see the item that used to say “Show Duplicate Items” change to Show Exact Duplicate Items. Click it.
  4. Now instead of showing you every song that is named the same, it’ll show you ones that are exactly the same, down to the file size, and beat.
  5. Like in the other process, hold down the Command key, and select the songs you no longer want to keep.
  6. Drag them to the Trash container in the Dock.
  7. Empty the Trash by right clicking on the Trash icon and selecting Empty.

And that’s it! It’s a very simple way of discovering duplicate tracks in your music library. There are tons of apps out there that do similar things, and offer fine-grained control over what is considered a duplicate. So if you don’t have success with this built in method, simply search the Mac App Store for “Duplicates” and you should be able to find an app to suit your needs.

How to enable a guest user for Mac OS X

Desktop computers aren’t the most popular anymore, it used to be that if you had one, you’d want a guest account on it so that visiting family and friends had access to the computer and Internet. Nowadays where we all use laptops the guest account isn’t as important, since you’re less likely to share your laptop. If you do want to set up a guest account so you can share your computer with a friend or a family member, Mac OS provides a great and easy way to set up and manage an account that doesn’t have a password or access to system files. Here’s how to set one up.

1. Open System Preferences by going to Apple Menu > System Preferences.

2. Next, click on the User and Groups icon in the System Preferences window.

mac-users-and-groups-1

3. Then, click on the lock in the lower left hand corner of the window, and enter your Administrator Password when OS X prompts you. This will allow you to make changes. Apple automatically locks things down so that you don’t change things unintentionally.

mac-users-and-groups-2

4. Next click on the Guest User item in the left hand pane of the window.

5. The next step is to check the box for “Allow guest to log into the computer”. This part will explain that a guest user will be able to temporarily log onto your computer. It does not require a password, or allow users to access any non-system specific files.

mac-users-and-groups-3

Below that, you will be presented with options to enable Parental Controls. If you choose to do so, you’ll have access to the Parental Controls panel. In that panel you’ll be able to control what files and folders, and more importantly applications, the guest account can access. This is great if the guest user on the computer will be a kid or someone you don’t trust with your info. You may want to access this panel just do get rid of access to the App Store.

Back on the Guest User panel, there is one more option: “Allow guests to connect to shared folders”. This, if selected, will allow people logged in as guests, to access any folders you have shared on the network while logged into your own account.

Conclusion

And that’s it. It is a relatively simple way to give someone temporary access to your computer. You’ll want to make sure you fully manage it with the parental controls in case your computer gets stolen. That way the thief won’t be able to access the App Store at all, which could save you loads of cash.

The Parental Controls are also great if you don’t want to enable full account access for your child. All they’ll have to do is access the guest account, and they’ll have access to whatever you permit. You can set parental controls for standard accounts as well, if you’d rather set up a full account for family members.